

-
Contents INTAKT CMS
Editing pages
The website has been built according to a design. This means that all website pages are already in place, with a lay-out based on that design. Editing a page involves some techniques that are generally the same throughout the whole website. The actual interface may differ according to the context.
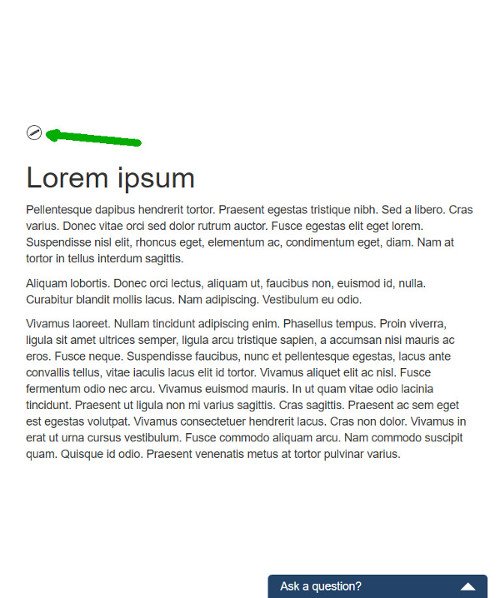
When logged in, all editable items in a page will display a link, often with a small ‘write’ image. Clicking once on that link will open a window that allows editing the item. That could be a text, an image, meta data, etc.
Editing text
Pages in a website can be considered as a collection of text and images (layout). This chapter is about editing text.
Most of the times a text editor is used to edit textst. This editor becomes visible in a popup after clicking on an edit link. The editor offers options to format texts, such as bold, italics, right align and, depending on the settings of your installation, fonts and text color. However, it is generally advised to use this sparingly, not to disturb the unity of the website design too much.
Edit text
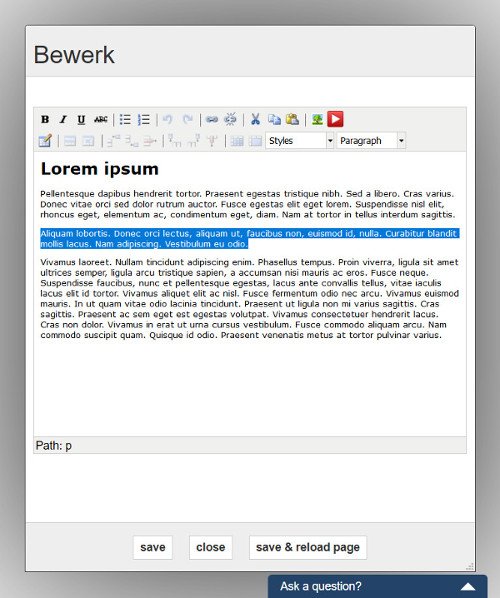
Text blocks (and images) in pages can be updated. At the top of a text-block you will see a link. Most of the times a button or image of a pencil, sometimes with text like "Edit content".

Open an edit window by clicking this link.
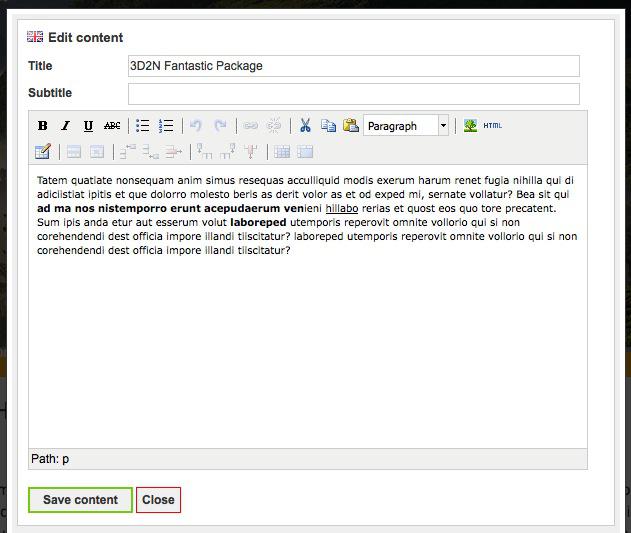
This Text Editing Window contains a number of elements:
- Title: This could be the title of a page, or the title of a paragraph, this depends on what kind of text you are editing.
- Description: The text to be edited. This field could have another name than "Description". Content or Text for example. This too depends on the kind of text you are editing.
Editing the text is much like text editing on your favorite application on your computer. (Word or OpenOffice Writer). In the formatting bar you will find tools for text styling. Most of the options in the formatting bar are commonly known. The number of options in this bar might change over time.
- The top row in the option bar contains: Bold text (B), Italic text (I), Underlined text (U), Strike-through text, Numbered List, Undo (Ctrl+z or Command+z), Redo (Ctrl+y or Command+y), Add link, Remove link, Cut, Copy, Paste, Style, Add or edit image.
- The second row in the option bar contains options for displaying tables.
Copy and paste text from an external source
Sometimes you want to use text that was written before. For example a text file on your computer. Text editing applications like Word or Open Office do not only save text in a file, but also styling of text. (font weight, color or headers for example) These styles will not be recognized by a web-page, and could result in strange results on screen.
It is not too complicated to filter these styles from the text. Just paste your text in Notepad (Windows application) and re-copy the text from there before pasting in the CMS editor. That way you are sure you are saving "plain text" in the CMS.
On Macintosh computers: First paste your text in Text editor. Choose form the menu: Format > Make Plain Text (or Shift+Command+T). After that, copy your text again, and paste into the CMS editor.
Paste rich text
If you paste text into the editor, some Intakt CMS installations will automatically remove the formatting. This is useful if you have copied rich text from a word document or from another website. That way it won’t cause unexpected effects in the layout of your own website.
If you want to copy and paste text from your own website to another page, it could be useful to preserve the style of the rich text. In such case, there is usually no danger that the formatting will produce unexpected effects, since it was copied from the same website.
If you use a text editor with a menu item "Edit", it is possible to choose whether the formatting is removed or retained during pasting. If the editor does not have this menu item, it might be an older version. Please contact Intakt to ask if the text editor can be upgraded.
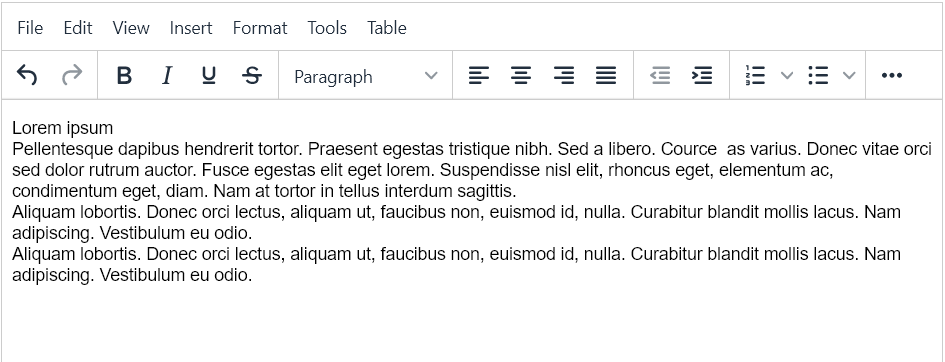
Consider this bullet list with formatting. The formatting of this rich text was created with the help of the editor. Therefore, it will not cause problems when pasted and placed in the website in that way:
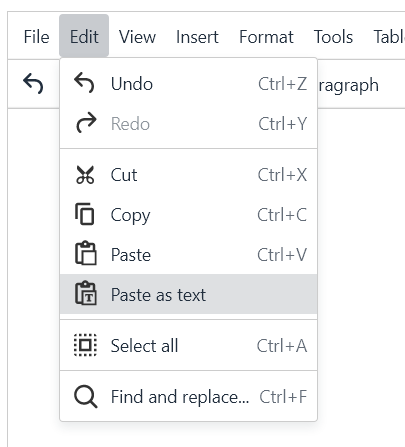
Normally, after pasting the formatting is removed:
In the edit menu of the editor, the option "paste as text" is checked. The editor has pasted "plain text" into the document.
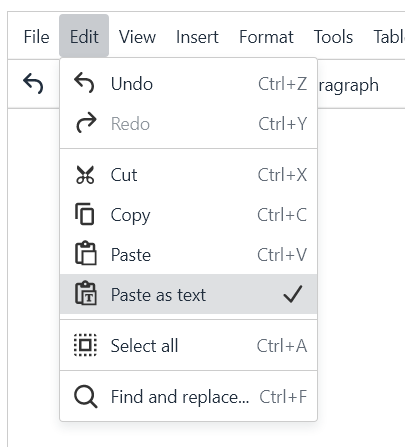
By clicking this option, the check mark disappears:
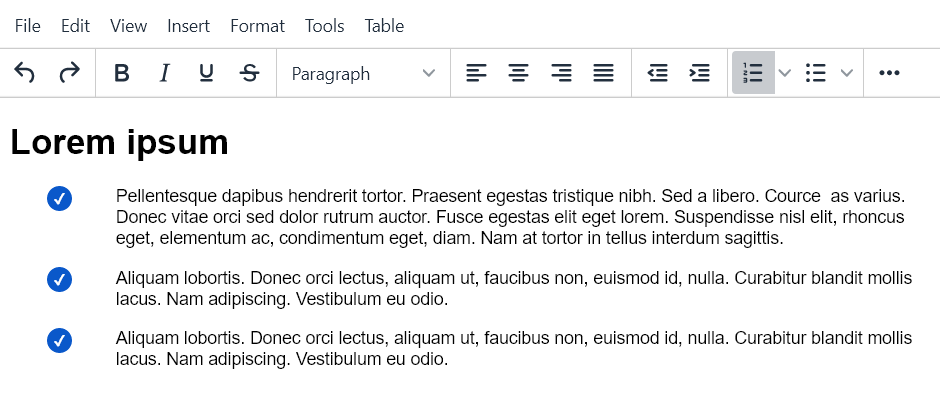
If the same bullet list is pasted now, the editor will leave the formatting intact:
Custom style in CMS text
Although the CMS text editor needs “plain text” without any style or markup, it is possible to add advanced styles or layouts to the text using the “styles” dropdown. The appearance has to match the overall layout of the website, therefore the dropdown is empty by default. Please contact Intakt if you need items added to the styles menu.
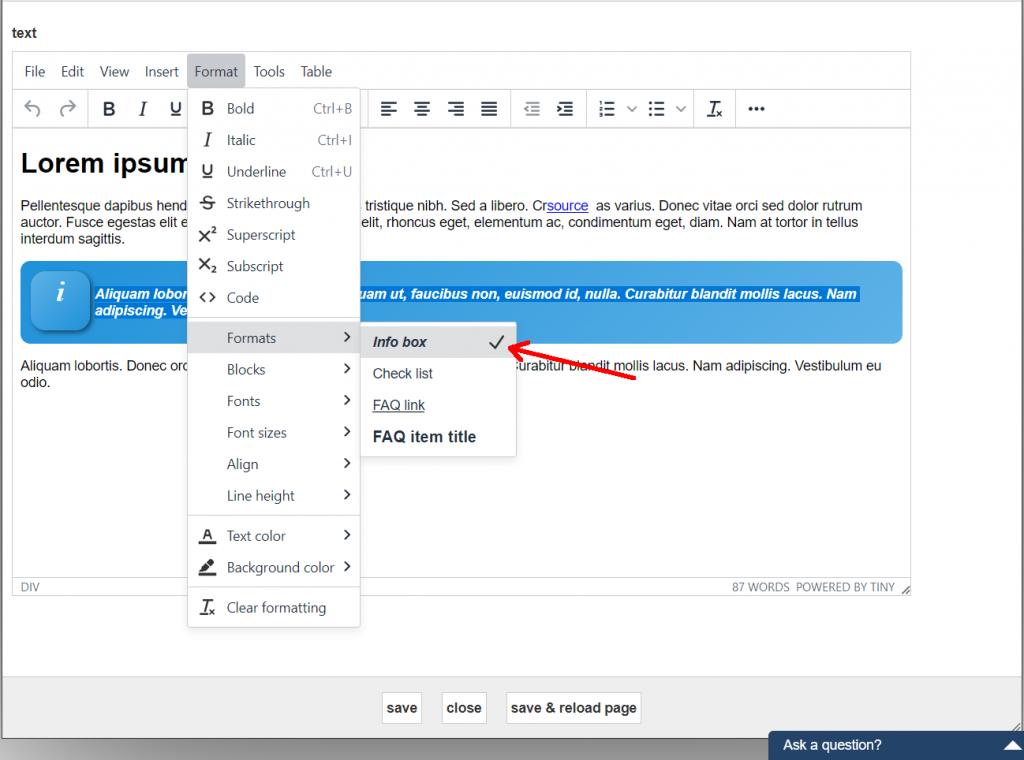
This example shows how an info box is added to the text:
Click the edit button to open the text editor
Select text to apply the style to.
Select a style from the dropdown or from menu Format > Formats in newer text editors
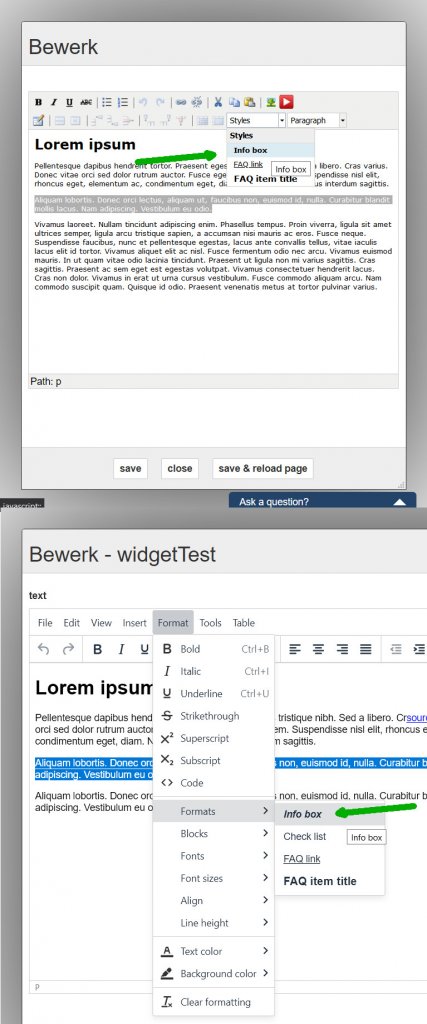
Save the content
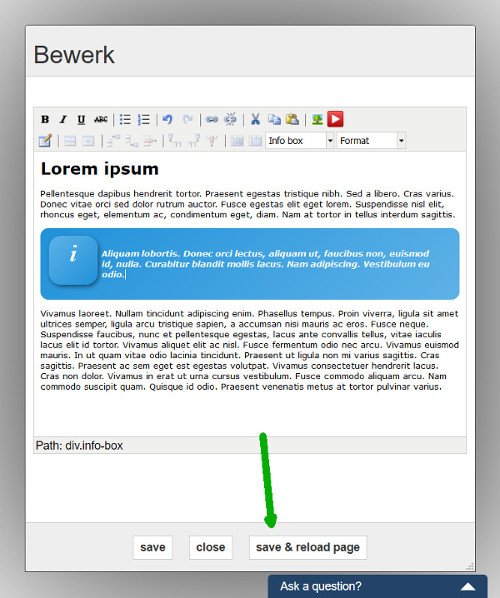
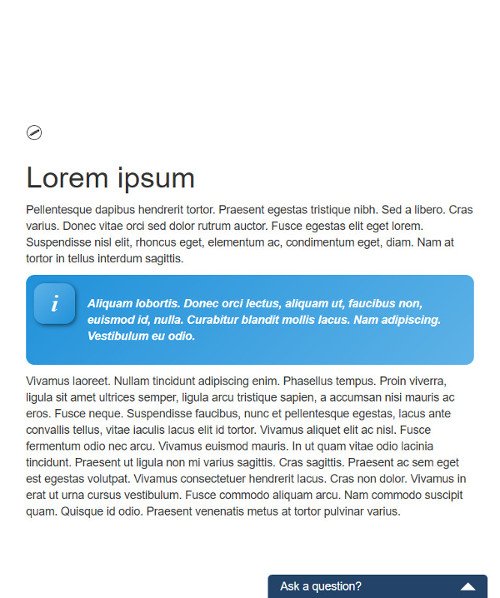
The result could be slightly different between the text editor and the webpage itself
Remove CMS style
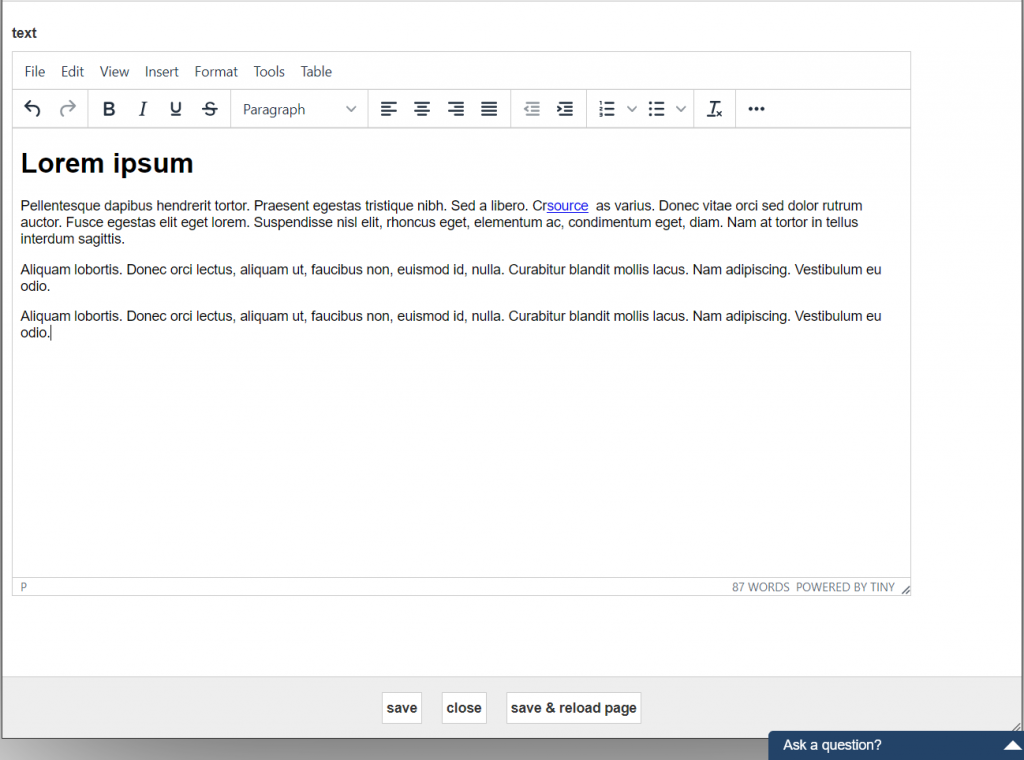
In the previous chapter it is explained how formatting can be applied to CMS text. In the example, an "Info box" was created via the Format or styles menu.
This formatting can also be removed. In simple words, this is done by performing the same operation again. The second time, clicking on a "Style format" results in removing the formatting:
To select the formatted text, you can place the cursor anywhere in that text, and then, just below the window, select the entire (html) element by clicking on it. In this case, that html element is "DIV".
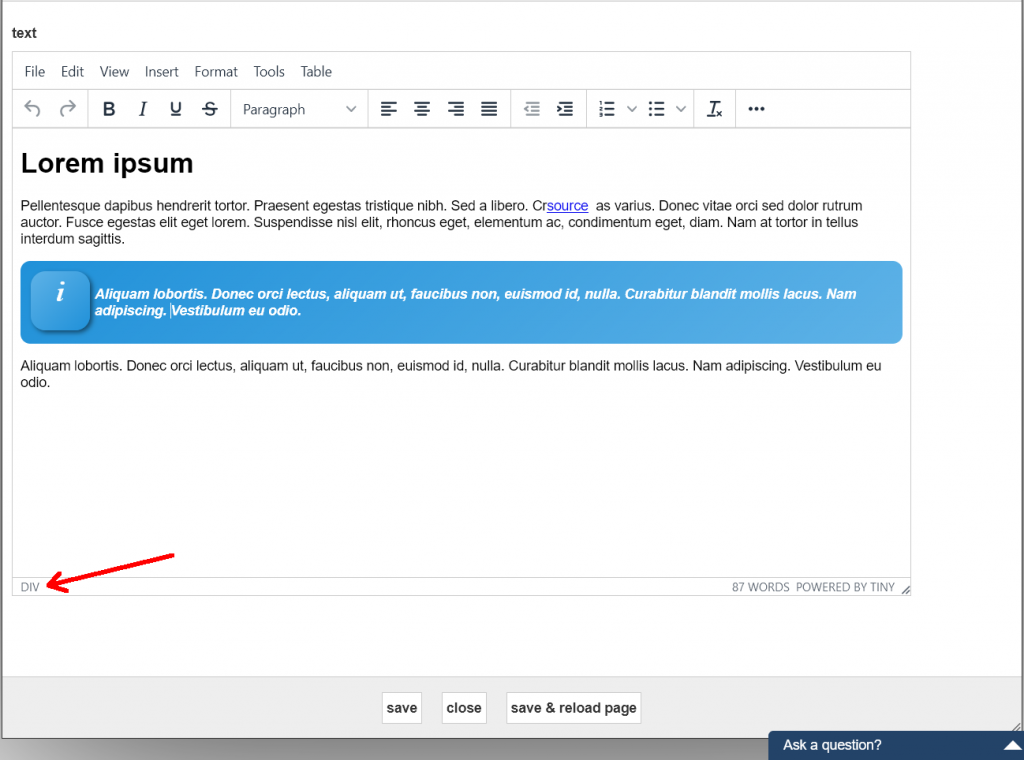
Clicking on the menu item Format > Formats > "Info box" the formatting will be removed. "Info box" has a check mark, this means that this formatting has been applied to the selection in the text. After clicking, this check mark will be gone.
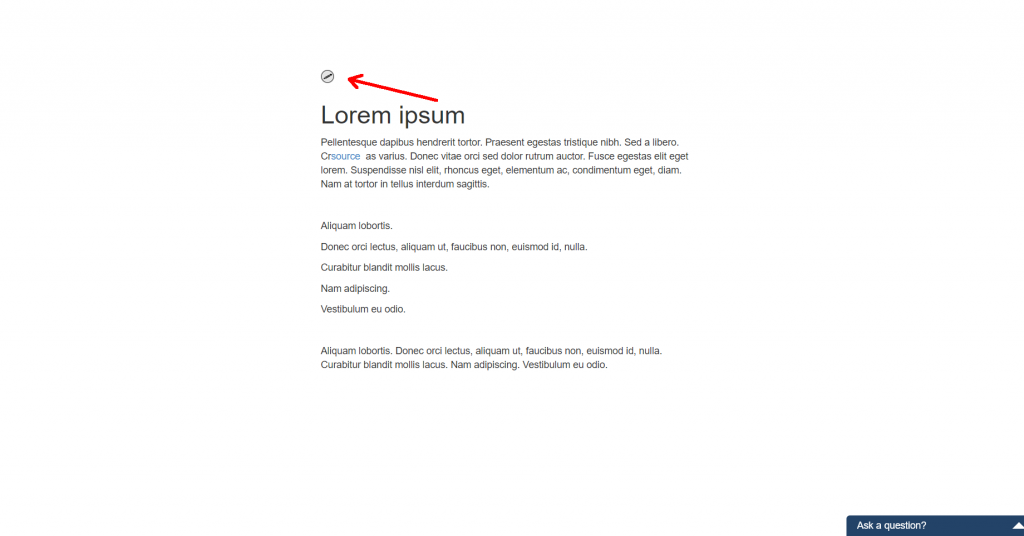
The formatting has now been removed.
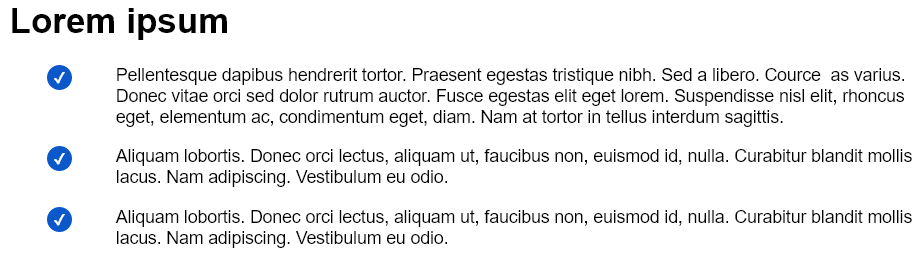
Styled checklist
In the text editor of the CMS, different types of standard lists are available. There are a number of variations for so-called "bullet lists" available and a number of ordered lists with numbers or letters.
In addition, there is the possibility to add a list type that uses a design that matches the rest of the website. A tailor-made variation will be created, and can be selected in the menu of the text editor.
If the option for you has been added to the text editor (in this example, that option is called "Check list"), follow these steps to apply it:
1) Click the edit button of the text.
2) Write the text with each item on a new line and select the whole list.
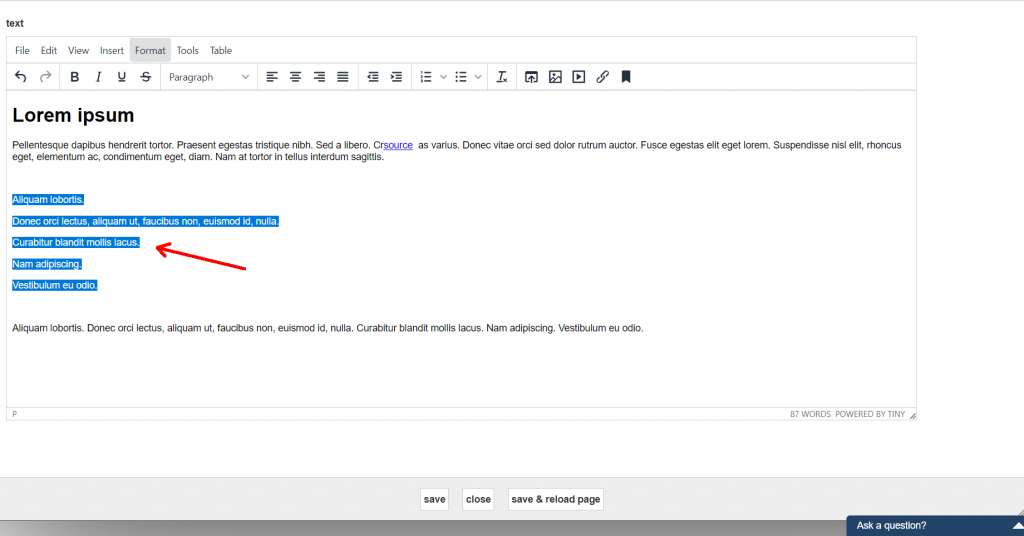
3) Assign the desired style through the menu option Format > Formats > "Check list"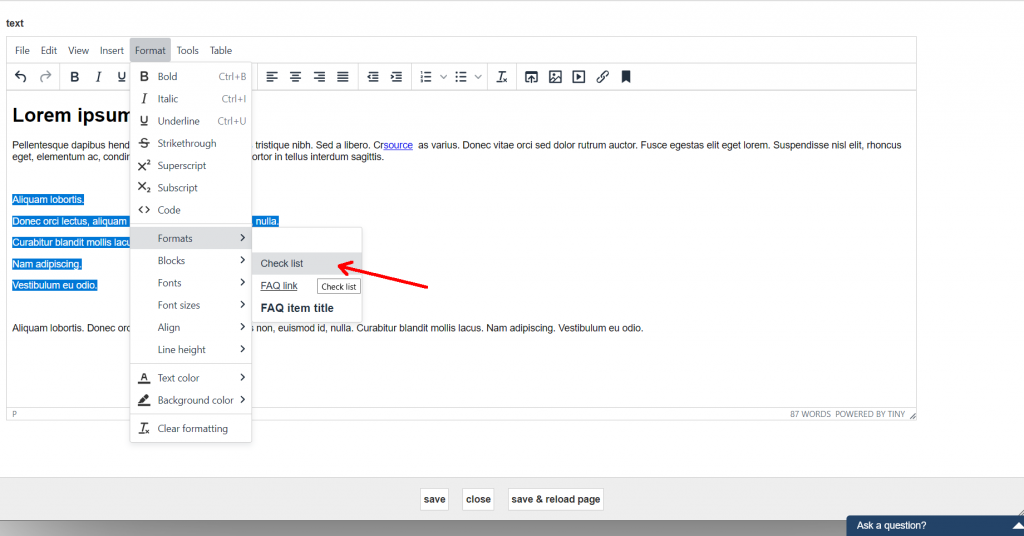
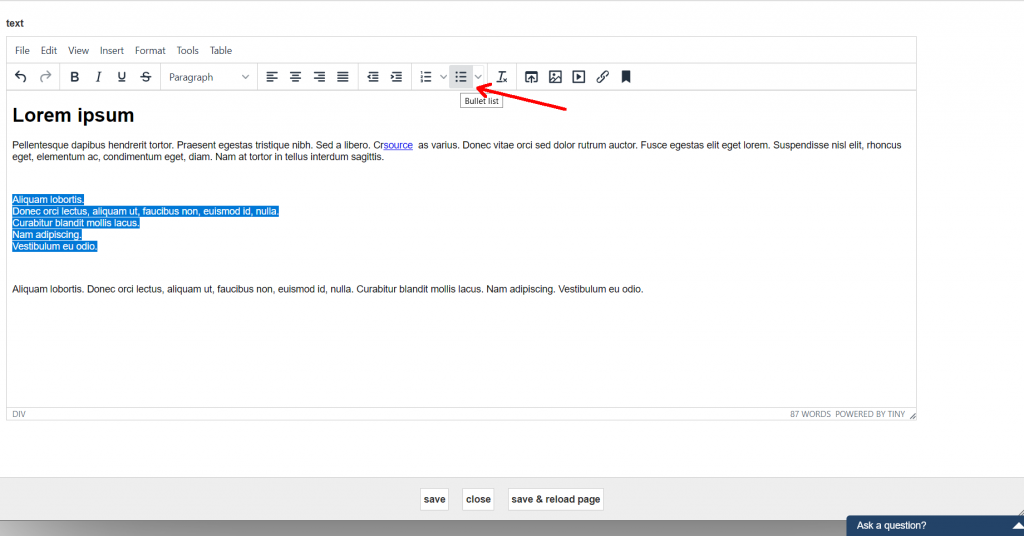
4) Then click (with the text still selected) on the Bullet list icon in the shortcut menu.
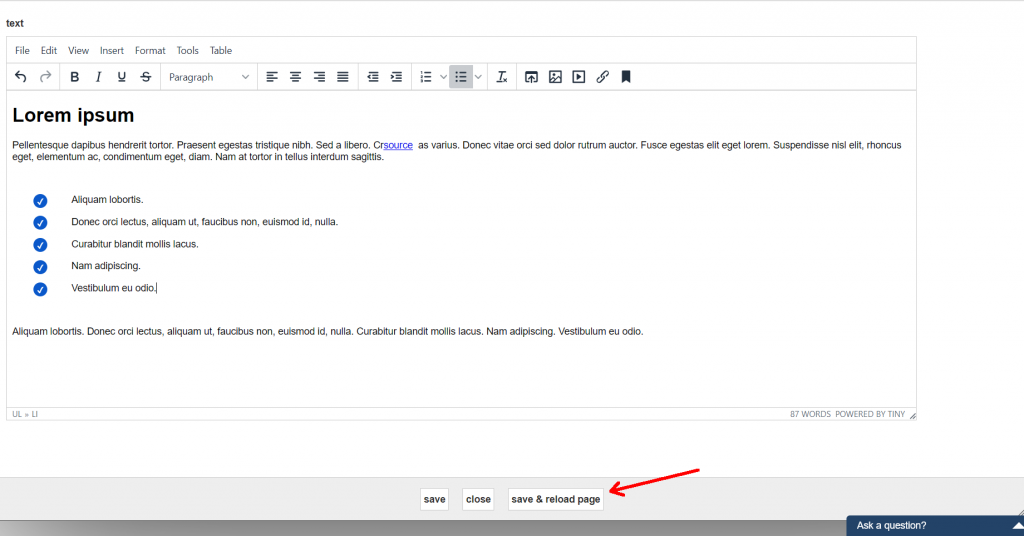
5) Don't forget to click "save &reload"
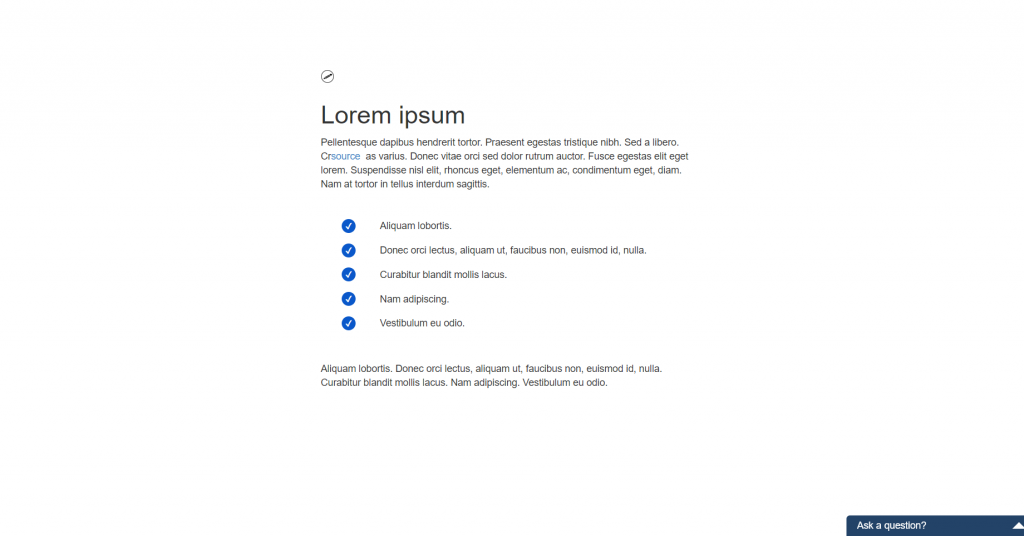
Your list is now in style with the rest of your website. If you cannot find this option in the Format menu, please contact diensten@intakt.com
Text links
Create a text link
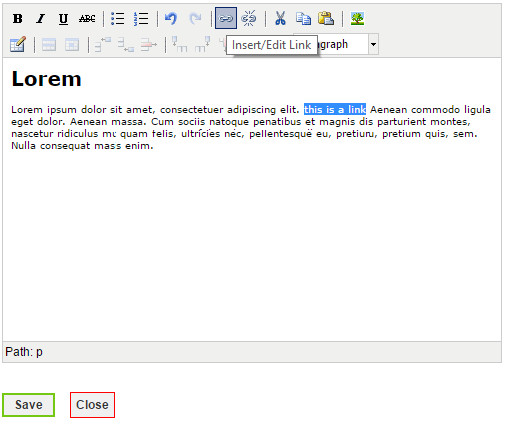
Select the text you want to turn into a hyperlink and click "Insert/Edit link"
A pop-up window will appear. This window will show properties that can be edited. The first thing to do is entering the url of your hyperlink. The target property will enable you to control weather the link should be opened in a new window, of in the current window.
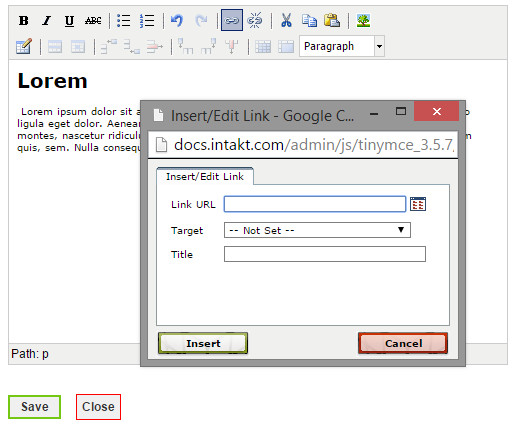
When you have set all properties, click "Insert" to create the link. The second pop-up window will close, and the selected text will behave as a hyperlink.
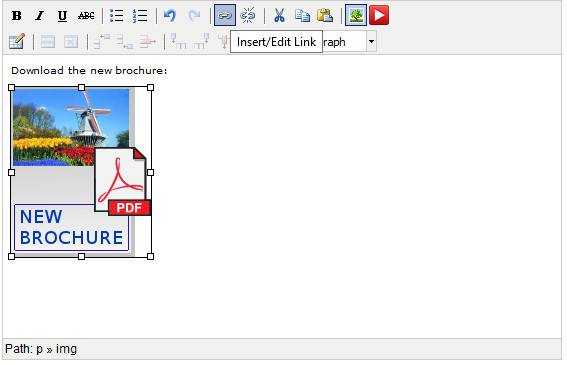
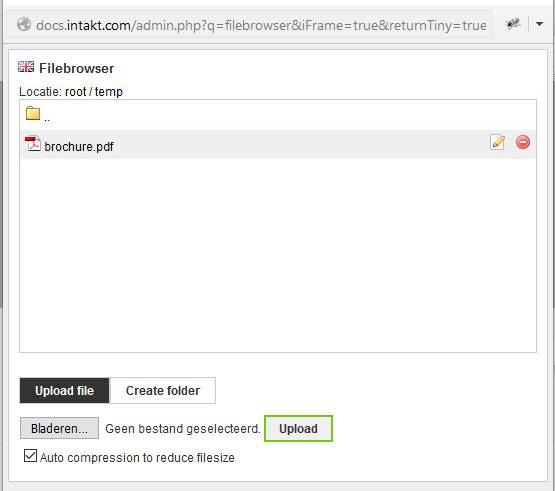
Link to a file on the server
Sometimes you might want a link to a file on the server, like price lists or brochure PDF's.
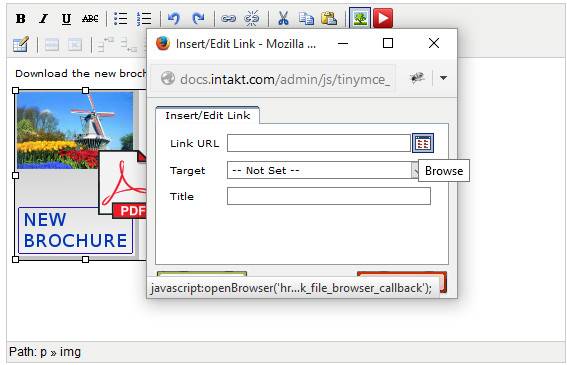
First of all, this file has to be uploaded to the server. To learn about uploading files to the server, please read chapter "Manage files".
Secondly, you have to create a link. This could be a text link or an image link. Select the image or text, and click "Insert/Edit link".
Click the "Browse" icon to locate the file on the server.
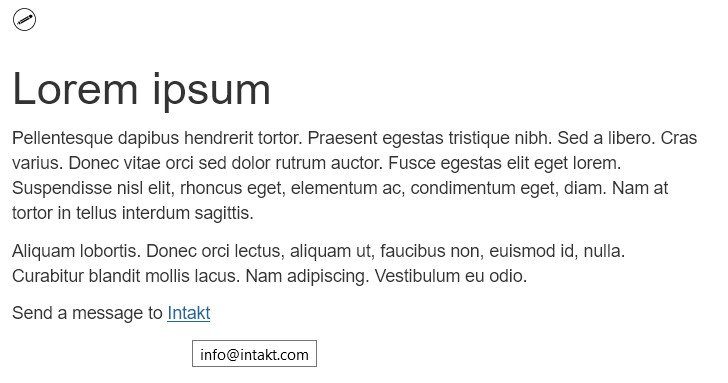
Email adress link
A “mailto link” is a link to an email address. Clicking a mailto link will make your computer look for the best suited action. Most of the times it will open your default email application. The email address will already be filled out. This way you can be sure the right e-mail address is being used.
Creating a mailto link is similar to creating a hyperlink:
First, select the text you want to turn into a link, and click the “insert/edit” button.

Enter the “mailto:” followed by the email address at “Lin URL”. For example mailto:info@intakt.com
Enter the email address at “Title” and click “insert”.
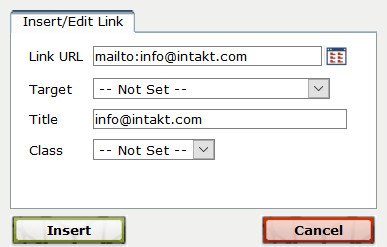
The text will contain the mailto link after you “Save & reload” the page. Hovering over the link will display the email address you filled out at “Title”
Advanced mailto links
A mailto link opens a new email message with a predefined receiving address. It’s also possible to predfine a subject, message text or cc and bcc adresses. Best is to only use simple text and characters, and test if the link is working properly.
Subject
A subject is defined by adding “?subject=” to the link.
For example:
mailto:info@intakt.com?subject=CMS manual
cc
A carbon copy address is added through “&cc=info@intakt.com”
bcc
A blind carbon copy address is added through “&bcc=info@intakt.com”
Text
Text is added by the addition of “&body=Dear Intakt” to the link.
We have a mailto link creator that might be easy to user: docs.intakt.com/email-link/
Edit a text link
To edit a link, select the text of the link and click "Insert/Edit link" to open the pop-up that will enable you to edit the properties of the hyperlink.
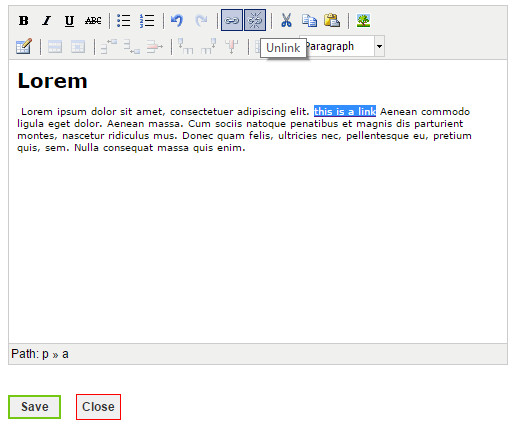
Remove a text link
To remove a text link, select the text and click the "Unlink" button. The link will be removed from the text.
Edit images
Insert an image
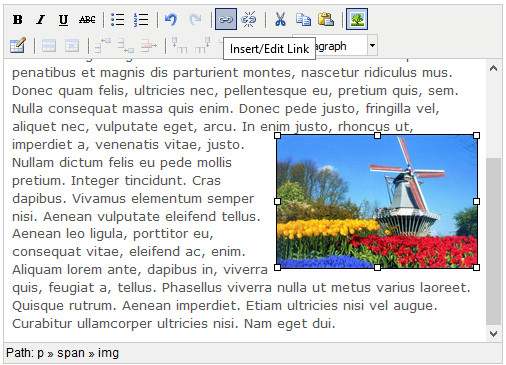
It is possible to insert an image in a text block: Move your cursor to the position you want to insert the image.
- Click on "Insert/Edit image" at the right top of the text block menu bar (image of a tree)
- A new window will come up showing the tab page "General".
- The tab "General" contains a search-button (see the red square in the image below)
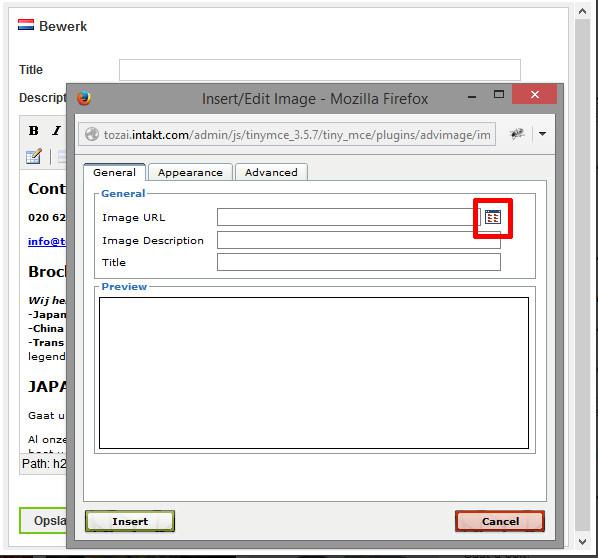
- A click on this button will open another window that let you manage files on the server. Click on a folder to open it. Navigate back clicking on folder ".."
- If you need to upload the image to the server, use the upload form at the bottom.
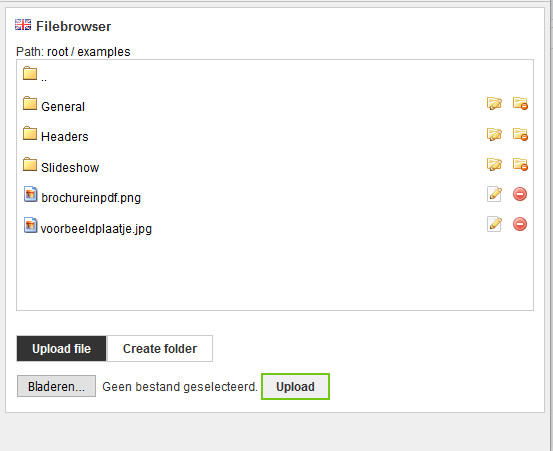
- Navigate to the image you want to insert, and click to select. The window will close, your image will appear in the preview block of the window underneath.
- Finally, adjust the aligning of the image to your needs. In tab "Appearance", select the alignment form the dropdown. For example "Right".

- Tip: At the right of this window a preview of the alignment is shown.
- Other adjustments will be explained in the next chapter.
- Click "Insert" and the image will be inserted into the text you were editing.
Adjust images in text
We can adjust the layout of images that were inserted into text.
First, select the image. Handles will appear around the image. The size can be adjusted by dragging these handles. The "Insert/edit Image" button will be activated (the image of a tree). This button will take you to a window where the image properties can be adjusted.
Adjusting the size of your image is possible in two ways:
By dragging the "handles" after selecting the image:

And by using the "Insert/edit image" button. Navigate to the "Appearance" tab in the edit image window to view the options.
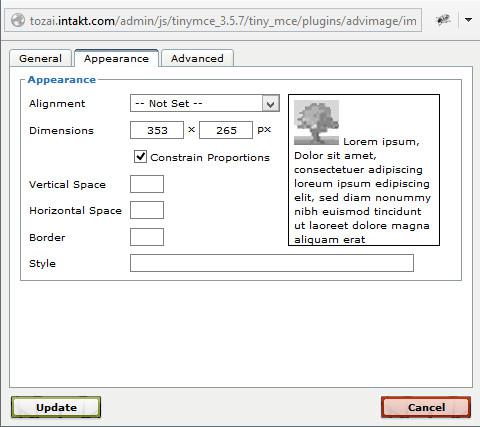
Dimensions: Adjust the image dimensions in pixels. (The image will be displayed at the size you request, but the image file on the server and it's size will not be affected by this.)
Alignment: set the alignment of the image. (left/right/middle)
Horizontal/Vertical space: Set a margin around the image.
Border: draw a border around the image.
Style: add extra css style to the image. Only of interest when you are familiar with using css.
The "Update" button will save your adjustments.
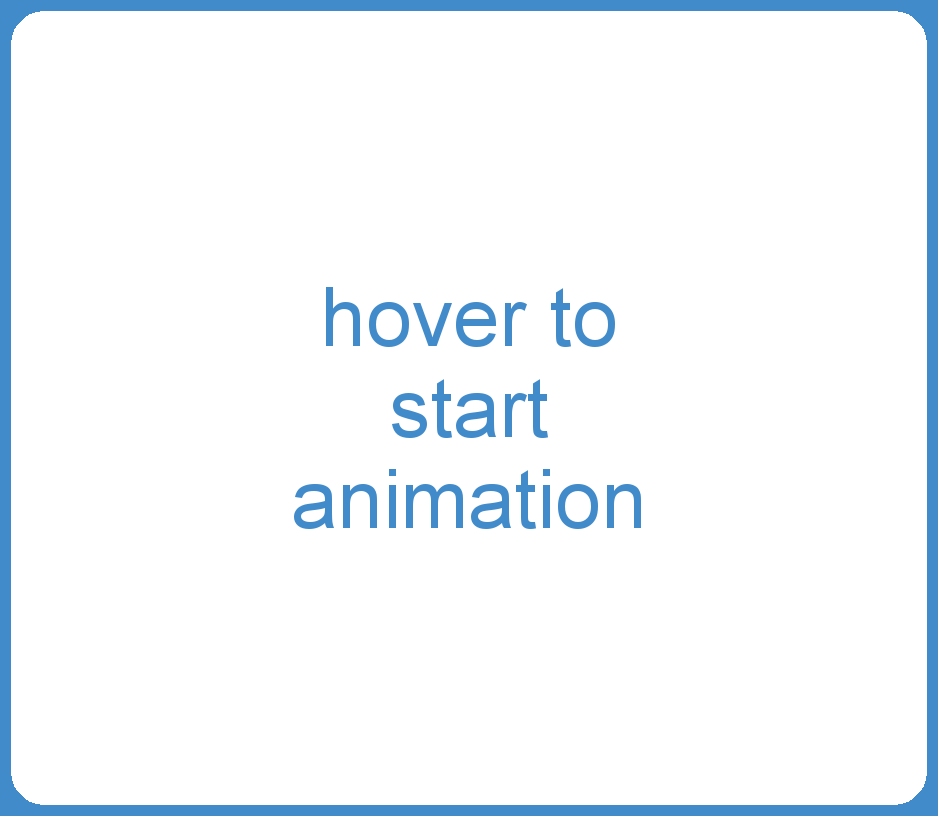
Hover Images
Hover images are defined in the tab page “Advanced” in the image edit pop-up. (select your image, click on the image edit button with the tree, select tab Advanced)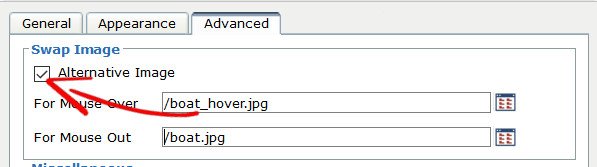
By selecting “Alternative Image” two options are enabled: “For Mouse Over” and “For Mouse Out”.
The first option contains the url of the image that is shown on hover. The second option is for the image on mouse out.
The animation below shows setting a hover image.
Images as a hyperlink
Create a link
Create images that behave as a hyperlink as follows: Select the image you want to turn into a link and click the button "insert/edit link".
A popup window will appear. This popup window enables you to enter properties. First of all, the url of the hyperlink has to be filled out.
The target option determines whether the link will be opened in the same window or a new one.
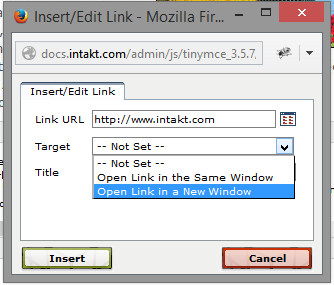
Click "Insert" after all options are filled out. The popup will close and your image has become a hyperlink.
Edit a link
Select the image-link you want to edit, and click on the "Insert/Edit Link" button. A popup with options will appear.
Remove a link
Select the image-link you want to delete and click the "Unlink" button. The link will be removed, the image is still there.
Text on buttons
Buttons are clickable items on a website that are part of the design. Buttons may refer to other pages on a website or can trigger an action such as applying a search filter or opening a slideshow.
Sometimes the text on such a button can be adjusted. Most of the times this adjustment applies to all pages where this button appears.
Edit button text
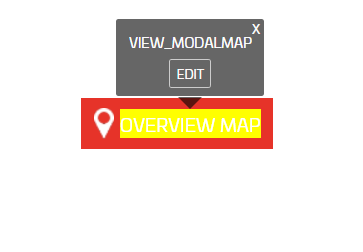
Below is an example of a button with text. In this case, it is a button that opens an overviewmap. This button appears on many different pages.
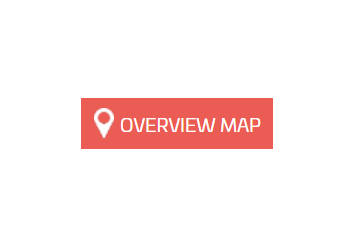
When the user is logged into the CMS and moves over the button with the mouse, a text balloon appears, and the background color of the text changes. This indicates that the text can be adjusted at the "Translations" section of the CMS.
In the "Translations" table you can save texts in different languages. An explanation of this functionality can be found here: Translations
Mail button
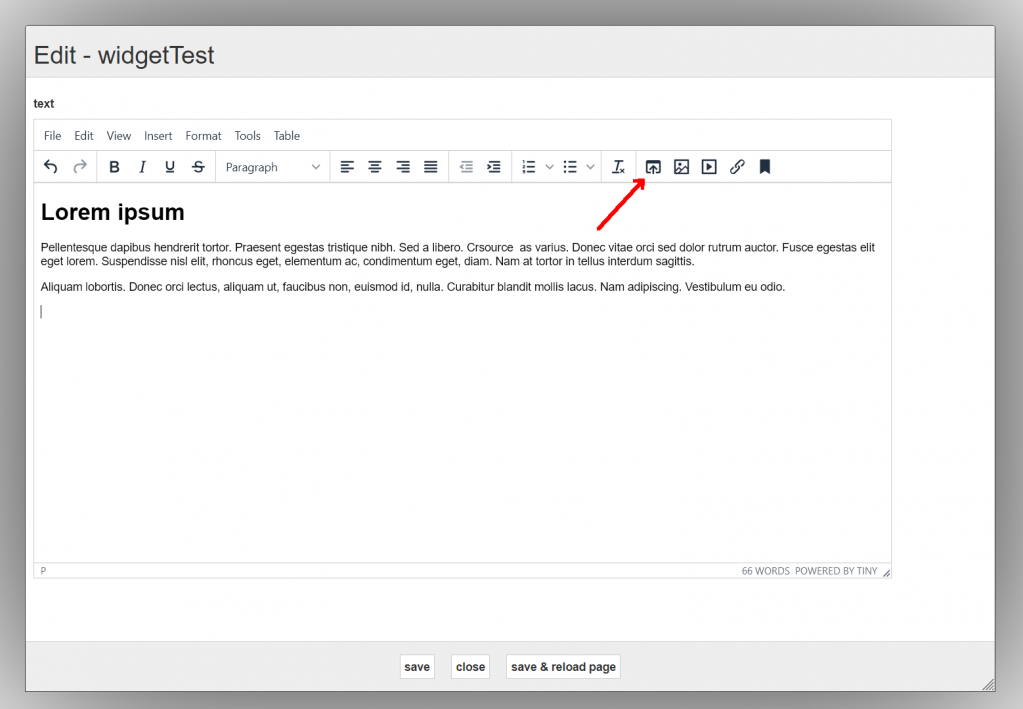
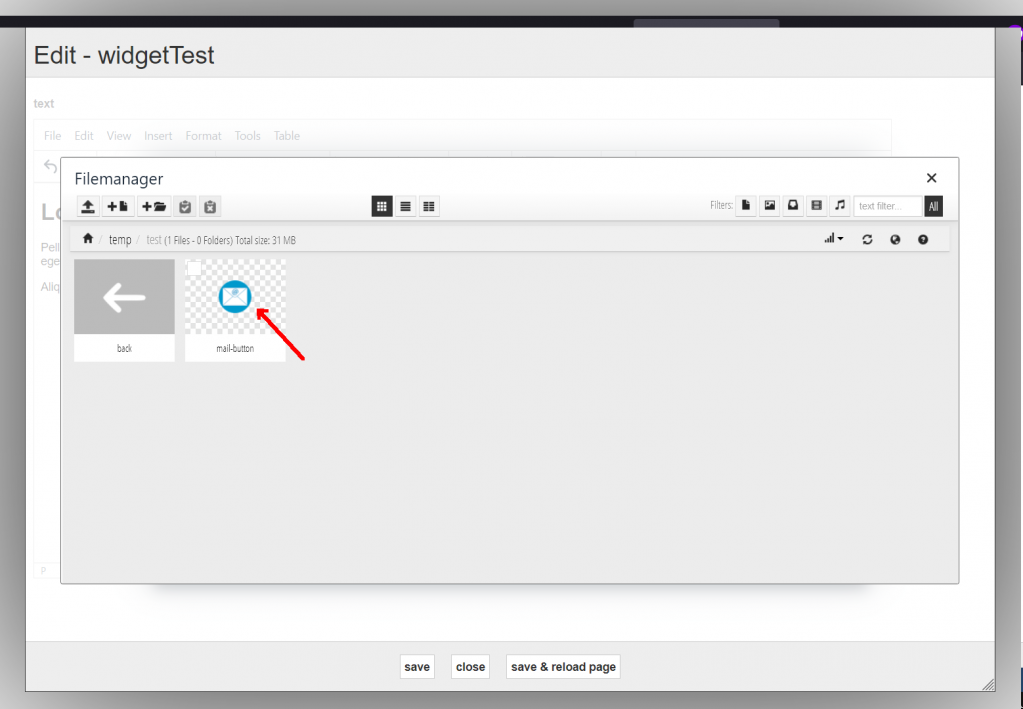
If you want to create an email button, you combine the actions described in "Email address link" and "An image as a hyperlink". A step by step description of this process is given below.
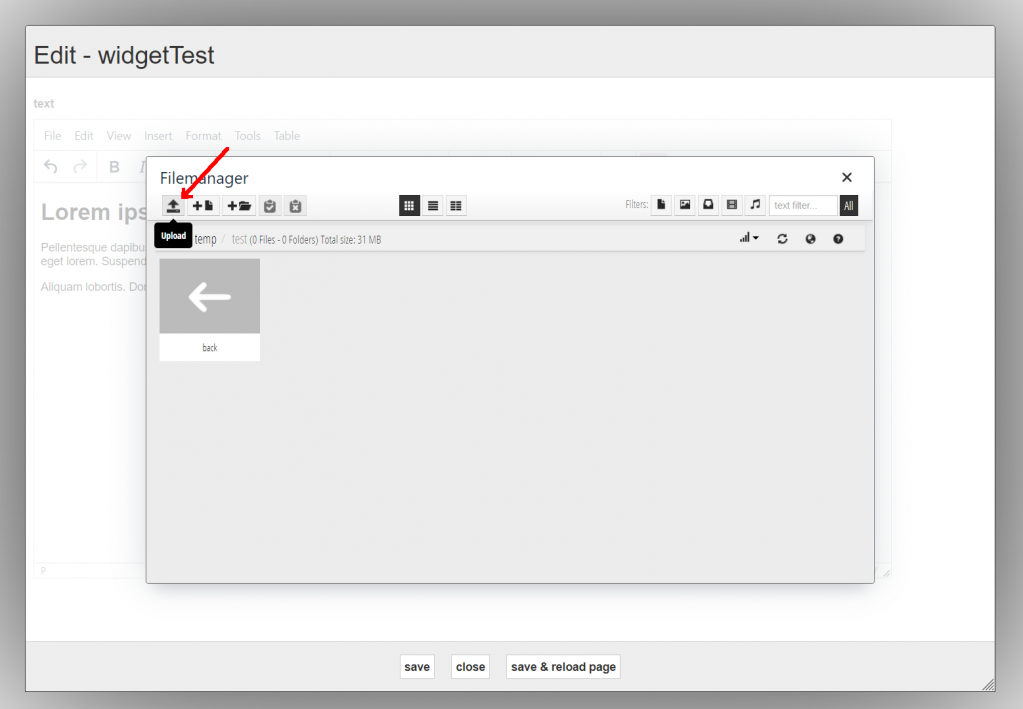
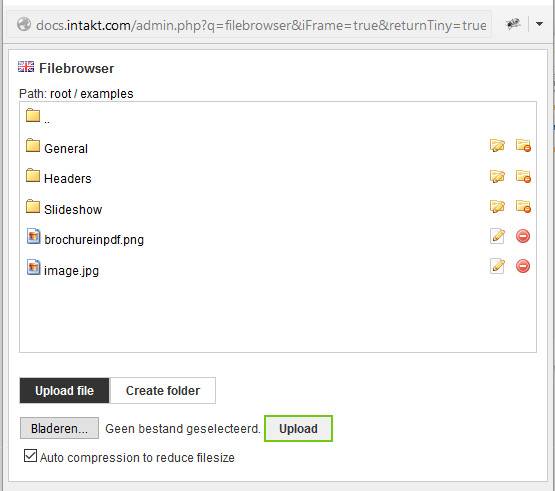
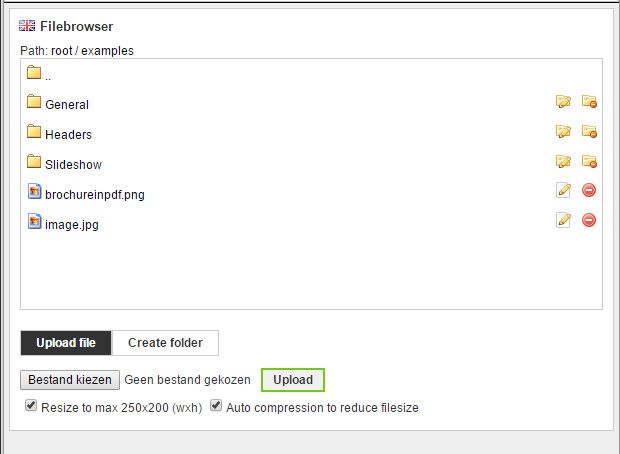
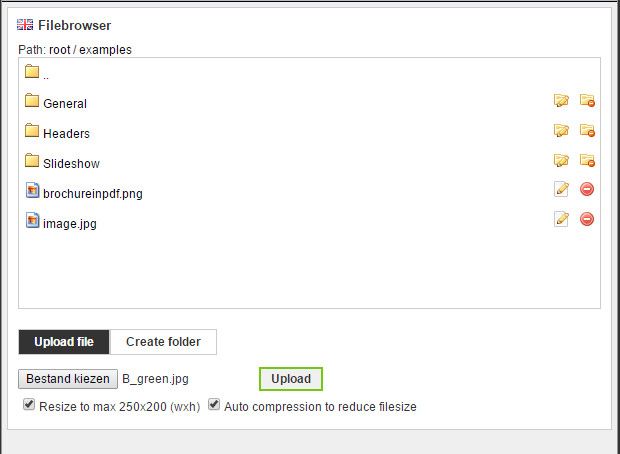
The image you want to use for this must be at least 40 pixels wide and 40 pixels high to be suited for a touch device such as a phone or tablet. The file manager is used to upload your image to the server.
Then click "Upload"
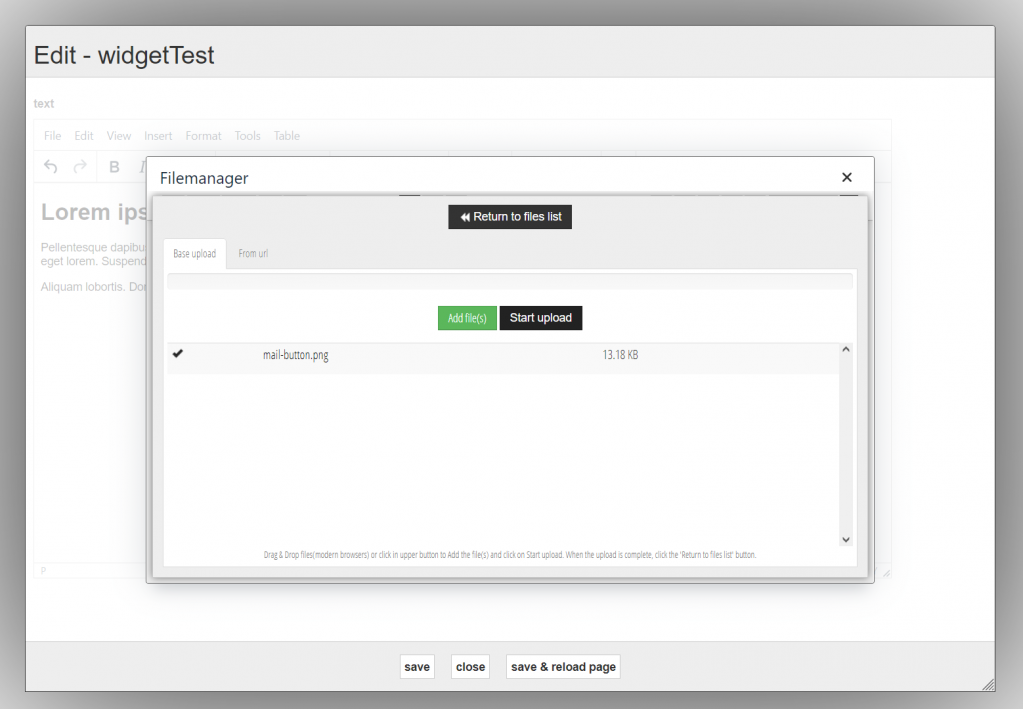
You can add files by dragging them to the upload list from your computer, or via the "Add file(s)" button. The "Start upload" button will upload them to the server. Click “Return to files list” when check marks appear in front of the file names.
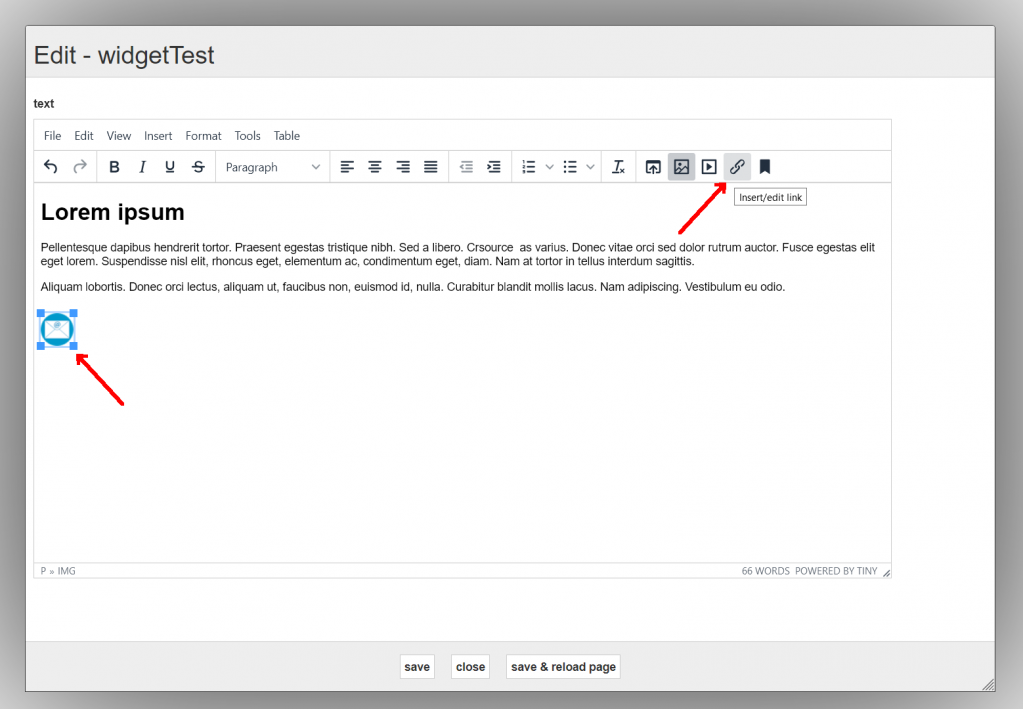
Insert the image in the text by clicking on it.
Now we can turn the image you have inserted into a "Mail button". Select the image and click on "insert/edit link"
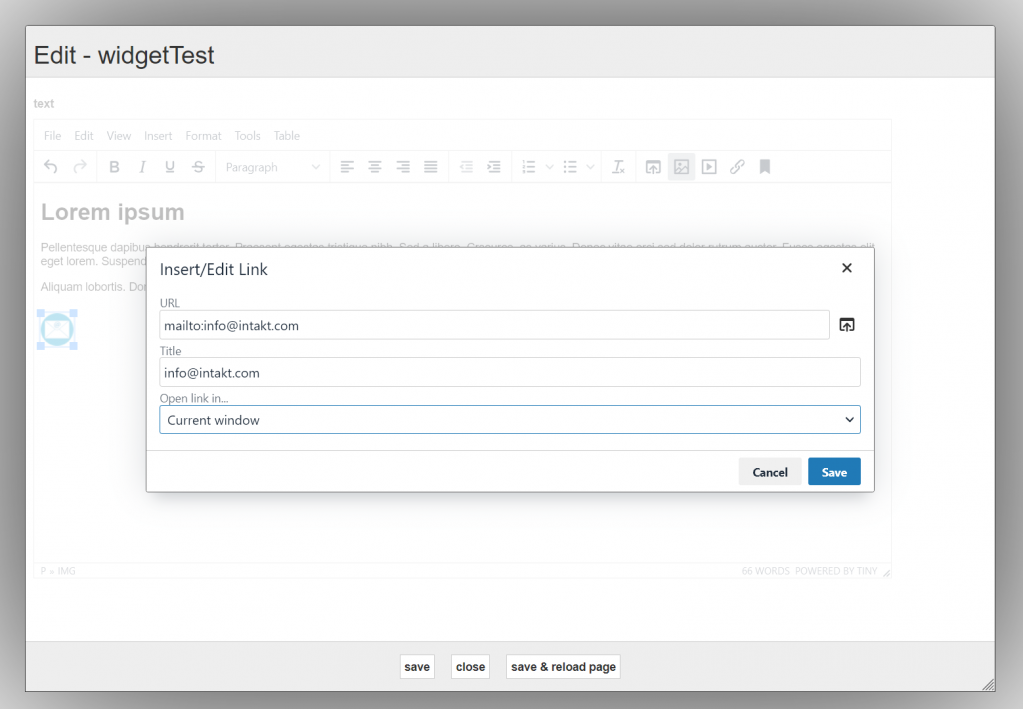
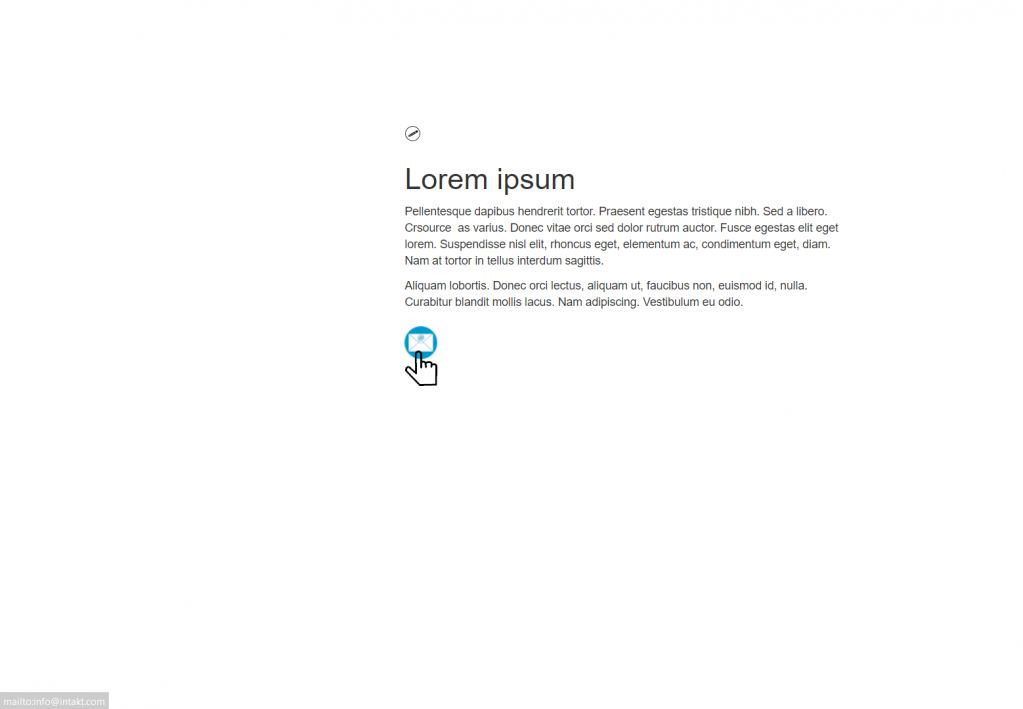
Enter "mailto:" followed by the e-mail address at URL. For example, mailto:info@intakt.com
At Title, enter the e-mail address and click on "Save".
Now click on "save &reload page"
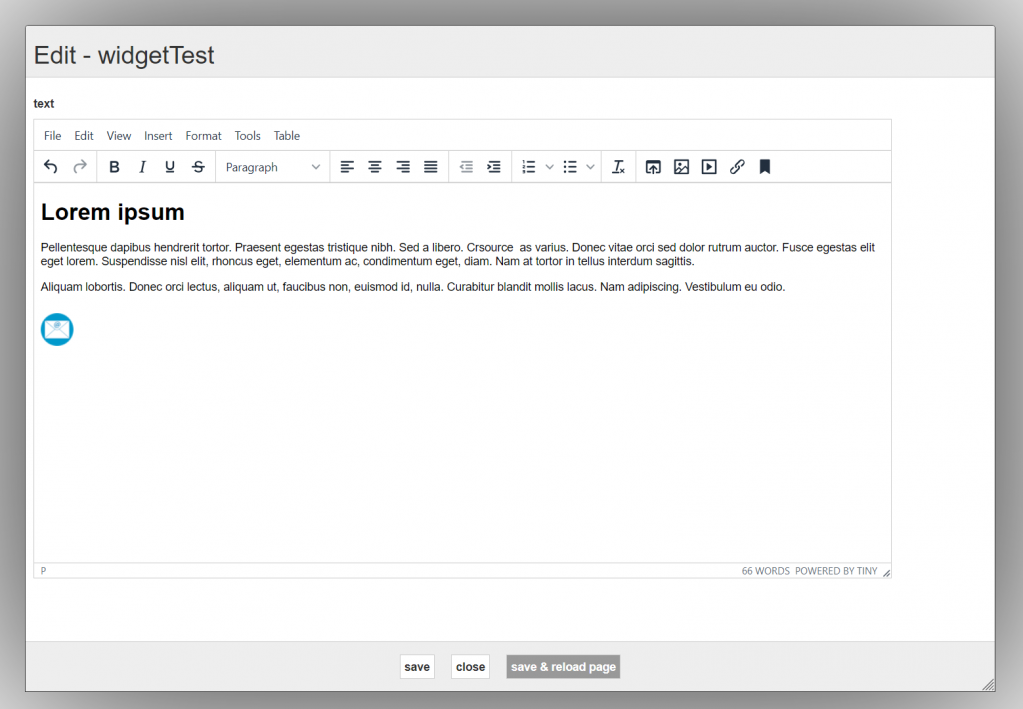
The image you have placed in the text is now a clickable one. If you click on it, the browser will open your standard mail program with the e-mail address already filled out.
Tip: If you also want to provide a default subject, cc or mail body, please follow the instructions in the advanced mailto links chapter, or use the email link creator: docs.intakt.com/email-link
Manage files
Create Folders
In general it is wise to use folders when saving files in the CMS. Folders help to keep files organized.
In the filebrowser window, click the button "Create folder" to add a new folder. Type your folder name and save.
N.B.: Use regular characters only when naming your files and folders.
Rename a folder
Click on the 'Edit' icon at the right side of a folder to edit it's name.
Remove a folder
Click on the 'Delete' icon at the right side of a folder. A new window will appear. Click "OK" to confirm that you really want to remove the folder.
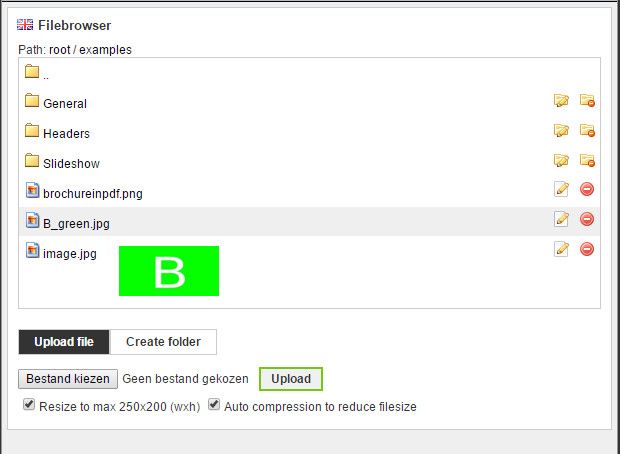
Upload files
Uploading files to the server is possible through the "CMS file browser".
First, navigate to the folder you want to upload the file to.
Click "Select file" button or a similar named button, it's name depends on the language setting of your internet browser. In the picture above, the button says "Bestand kiezen". You will be able to select a file on your computer. Not all files are allowed to be uploaded. These files should be allowed:
- Word files
- Pdf files
- Excel files
- jpg images
- png images
- gif images
- text files with the extension ".txt"
If you need to upload other file types, please contact diensten@intakt.com to discuss this.
In the case of uploading images, you might have extra options. Depending on the configuration of your website, there could be an option to resize your image and to adjust compression. (see image above, underneath button to select your file and the button "Upload".)
The first option will resize the image in the case that it is larger than the dimensions shown.
If possible for that file type, the second option will adjust the compression. High compression will result in less image quality and less filesize.
Both options might result in less server space usage and less data traffic per page view. If you do not have these options, you can add this functionality by contacting diensten@intakt.com.
After you successfully selected a file on your computer, the name of the file will appear next to the "Select file" button.
Click button "Upload". Your file will appear in the folder.
Uploading fails
Some files will fail to upload. Most of the times a message will be shown:
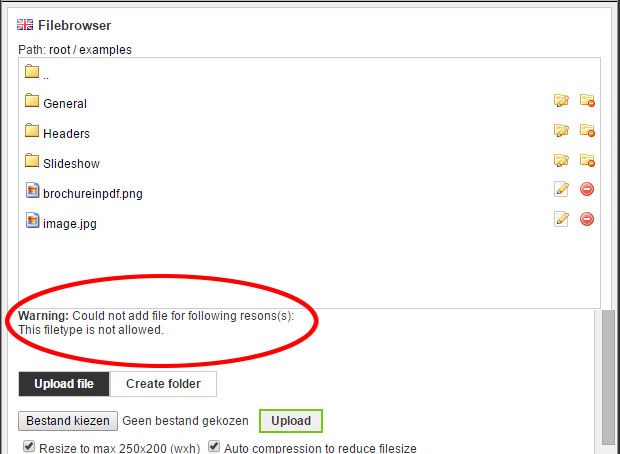
In this case the message states that the file type you tried to upload is not allowed.
Rename and remove a file
Renaming and removing files works in the same way as renaming and removing folders.
Metadata
The admin row that is visible after you log in to the CMS has a menu item "Edit meta". Metadata is not visible for normal visitors, but is used by search engines to index and display search results.
URL: This field contains the address of a page. This url has to be a unique value within the domain or website. (The use of normal alphabetic characters, numbers, - or _ are preferred for url's. A slash "/" is never allowed in an url, this character is reserved for other purposes when entered into an address bar. The page will not be shown when this character is used in a wrong way.)
Meta title
A correct title helps search engines to determine what kind of information is displayed on the page. It has a relatively large impact on "ranking" in search results, and is probably the most important "meta tag". The absence of a meta title has a relatively large influence on the place within search results. It is therefore wise to always fill out a meta title.
The meta title appears at the top of the browser window, in most browsers in the tab. The meta title appears in the search results page of search engines as well. Therefore the title plays a big role for users, especially if it gives an accurate impression of what kind of content can be found on the page.
Writing a meta title:
– Make sure that a title consists of less than 60 characters
– Use a unique title for each individual page
– To give visibility to your brand, you can add it to the title For example "The 5 most beautiful oceans in the world – Holland-America Line"
Meta description
Meta descriptions contain a description of the content of the page. This is shown in result pages of search engines, directly below the meta title. It's therefore important to provide a compelling, compact description of the page that makes people want to click on the link.
While the meta description won't directly affect how search engines index your site, it will affect the number of clicks on your website. Since the number of clicks does influence the position in search results, indirectly the meta description does have effect on the "ranking".
Meta description writing:
– Make sure a description contains at most 130 characters
– Clearly describe what the visitor can expect when he clicks on the link
– Use a unique description for each page
A meta description is not always shown in search results. Depending on what the user is looking for, Google might choose to show parts of text on the page, while other search engines simply do show the meta description.
Meta tags (keywords)
The meta tag keywords is rarely used anymore. They will not be displayed on the page itself, and search engines will usually ignore them. Leaving it empty is fine.
Previously, keywords were used to quickly represent what the contents of a page is.
SEO
SEO is short for Search Engine Optimization. A process to improve the visibility of your website at Google, Bing, Duckduck go and other search engines for users that are interested in products or services that are linked to yours. A better visibility will increase the chance that your website will attract the attention of your customers and other interested people.
Search engines will scan pages on the internet and store information about them. This information is analyzed and ranked by an algorythm.
Ranking is mainly based on the content and metadata of the pages, but some technical properties will influence the ranking as well.
Search engines
Search engines are websites where you can find information on the internet by using keywords. Because many people regularly use search engines as a starting point for a search, it has become very important that these search engines know how to find your website, and know what your website is offering.
Search engines develop their own search system and filters in order to deliver the best possible service they can. How these algorithms work is usually kept secret, the search engines think they can deliver the highest quality that way.
The most famous and by far the most used search engine is Google, but there are also other search engines, some of which are becoming increasingly popular. The four most used search engines:
Although search engines give little information about the way in which they 'index' websites, they give tips and guidelines on a number of technical aspects. Intakt has built a tool into the CMS for this. Because Google is by far the most popular, we decided to follow those guidelines. More on that in the next chapter.
Scores
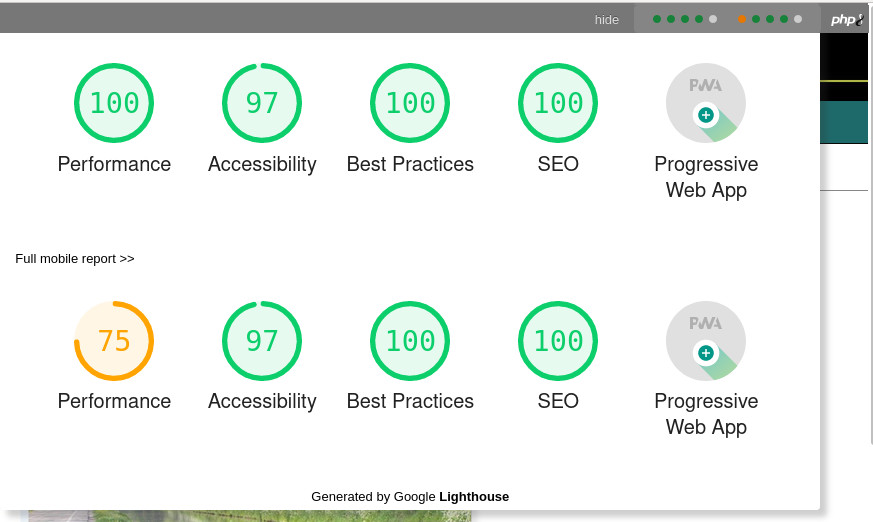
Lighthouse is an automated tool that assesses web pages for technical aspects such as “performance, accessibility, best practices, SEO” and more. This tool has been developed in collaboration with google, and a good score will also be beneficial for ranking in search results.
The Intakt CMS has an integrated lighthouse tool. This tool scans each page once regular basis and displays the results in the top right corner of the screen. When hovering over the colored dots, more details about the scores appear. The links “Full desktop report” and “Full mobile report” takes you to a page with detailed description and often suggestions for improvement.
Scores
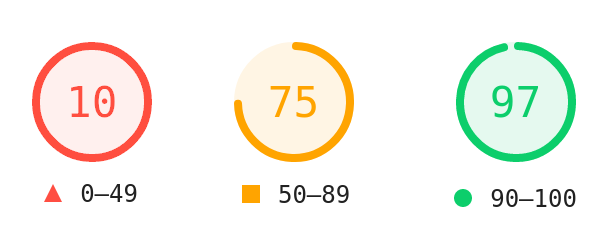
There are three different score colors; red, orange and green. You can assume that a red score (0-49) is so unfavorable that it should be looked at, orange (50-89) is not alarming but it would be nice if an improvement will be made, and with green ( 90-100) the score for that part is OK.
A score of 100 (the best score) is not always achievable, but a green color should usually be possible after technical or content changes on the web page. The detailed lighthouse report will list improvement suggestions in case of a less favorable score. You should be able to implement many of these improvements yourself, please ask Intakt for assistance if necessary. For some (technical) issues the help of Intakt is needed. You can consult diensten@intakt.com at anytime for advice.
Page properties that are part of the lighthouse report (not a complete list):
Performance
– First Contentful Paint (First Contentful Paint marks the time at which the first text or image is painted.)
– Time to Interactive (Time to interactive is the amount of time it takes for the page to become fully interactive.)
– Speed Index (Speed Index shows how quickly the contents of a page are visibly populated.)
– Total Blocking Time (Sum of all time periods between FCP and Time to Interactive)
– Largest Contentful Paing (Largest Contentful Paint marks the time at which the largest text or image is painted.)
– Cumulative Layout Shift (Cumulative Layout Shift measures the movement of visible elements within the viewport.)
Accessibility
– Navigation: Invisible elements that make navigating with the help of a keyboard or screen reader (for the blind and partially sighted) easier.
– Colors: Check whether foreground and background colors contrast enough to be easy to read.
– Pictures: Check whether pictures contain an (invisible) description to give the blind and partially sighted a better experience.
– Headers: Check whether the page uses headers logically with respect to the structure of the text. Especially regarding screen readers (for the blind and visually impaired).
Best Practices
– Safe use of links
– Check if known vulnerable code is used.
– .Correct and efficient use and display of images
– Server related functionality such as the use of HTTPS.
SEO
– Operation of links and their description in the link tag
– Using “structured data” to help search engines understand the content of the page better
– Presence of metadata such as meta title, and meta description
– Validity of robots.txt indicating which pages should or should not be included in search results
– Description of images using an [alt] attribute
– Whether the document contains information about the language
– Font size
– Size of clickable areas